文本嵌入器是一项机器学习任务,用于创建一段文本的矢量表示。然后可以将该向量用作机器学习算法的输入。文本嵌入的目标是以适合机器学习的方式捕捉文本的含义。
创建文本嵌入的方法有很多种,但最常见的是使用神经网络。神经网络是一种机器学习算法,非常擅长学习复杂的关系。神经网络的输入是一个向量,输出是一个相同大小的向量。神经网络学习以捕获输入和输出之间关系的方式将输入向量映射到输出向量。
要创建文本嵌入,首先要在大量文本上训练神经网络。训练数据是一组句子,每个句子表示为一个向量。这些向量是通过获取句子中单词的单词向量并将它们加在一起来创建的。然后训练神经网络将句子向量映射到固定的向量大小。
一旦神经网络被训练好,它就可以用来为新的文本片段创建文本嵌入。新文本首先表示为向量,然后使用神经网络将向量映射到固定的向量大小。结果是捕获文本含义的文本嵌入。
文本嵌入可用于各种机器学习任务。例如,它们可用于提高用于对文本进行分类的机器学习算法的性能。文本嵌入也可用于查找相似的文本片段,或将文本聚类在一起。
创建文本嵌入有许多不同的方法,方法的选择将取决于应用程序。然而,神经网络是一种强大且广泛使用的创建文本嵌入的方法。
💬公司:在这里
Co:here 是一个强大的神经网络,可以生成、嵌入和分类文本。在本教程中,我们将使用 Co:here 嵌入描述。要使用 Co:here,您需要在 Co:here 上创建帐户并获取 API 密钥。

我们将用 Python 编程,所以我们需要安装cohere库pip
pip install cohere首先,我们必须实施cohere.Client. 在 Client 的参数中应该是您之前生成的 API 密钥和版本2021-11-08。我将创建该类CoHere,它将在接下来的步骤中派上用场。
class CoHere: def __init__(self, api_key): self.co = cohere.Client(f'{api_key}', '2021-11-08') self.examples = []💾 数据集
每个神经网络的主要部分是一个数据集。在本教程中,我将使用一个包含 10 个类的 1000 个描述的数据集。如果你想使用相同的,你可以在这里下载。
下载的数据集有 10 个文件夹,每个文件夹有 100 个files.txt带有描述。文件名是描述的标签,例如sport_3.txt.
我们将Random Forest与进行比较Co:here Classifier,因此我们必须通过两种方式准备数据。因为Random Forest我们将使用Co:here Embedder,我们将在本教程中重点介绍它。Cohere 分类器需要样本,其中每个样本都应该设计为一个列表[description, label],我在之前的教程(这里)中做到了
示例加载路径
一开始,我们需要加载所有数据来做到这一点。我们创建函数load_examples。在此函数中,我们将使用三个外部库:
os.path进入包含数据的文件夹。代码在 python 的路径中执行file.py。这是一个内部库,所以我们不需要安装它。
numpy这个库对于处理数组很有用。在本教程中,我们将使用它来生成随机数。你必须通过 pip 安装这个库pip install numpy。
glob帮助我们读取所有文件和文件夹名称。这是一个外部库,因此需要安装 – pip install glob.
下载的数据集应解压缩到文件夹中data。通过os.path.join我们可以获得文件夹的通用路径。
folders_path = os.path.join('data', '*')在 Windows 中,返回等于data\*.
然后我们可以使用glob方法获取所有文件夹的名称。
folders_name = glob(folders_path)folders_name是一个列表,其中包含文件夹的窗口路径。在本教程中,这些是标签的名称。
['data\\business', 'data\\entertainment', 'data\\food', 'data\\graphics', 'data\\historical', 'data\\medical', 'data\\politics', 'data\\space', 'data\\sport', 'data\\technologie']训练数据集的大小Co:here不能大于 50 个示例,每个类必须至少有 5 个示例,但我们Random Forest可以使用 1000 个示例。使用循环for我们可以获得每个文件的名称。整个函数看起来像这样:
import os.pathfrom glob import globimport numpy as npdef load_examples(no_of_ex): examples_path = [] folders_path = os.path.join('data', '*') folders_name = glob(folders_path) for folder in folders_name: files_path = os.path.join(folder, '*') files_name = glob(files_path) for i in range(no_of_ex // len(folders_name)): random_example = np.random.randint(0, len(files_name)) examples_path.append(files_name[random_example]) return examples_path最后一个循环是随机获取每个标签的 N 条路径并将它们附加到一个新列表中examples_path。
载入描述
现在,我们必须创建一个训练集。为此,我们将使用load_examples(). 在每个路径中是一个类的名称,我们将使用它来创建示例。描述需要从文件中读取,长度不能太长,所以在本教程中,长度将等于100。listtexts是追加的list [descroption, class_name]。因此,返回就是那个列表。
def examples(no_of_ex): texts = [] examples_path = load_examples(no_of_ex) for path in examples_path: class_name = path.split(os.sep)[1] with open(path, 'r', encoding="utf8") as file: text = file.read()[:100] texts.append([text, class_name]) return texts🔥 Co:here 分类器
我们回到CoHere课堂。我们必须添加一种方法——嵌入示例。
第二种cohere方法是嵌入文本。该方法有几个参数,例如:
model模型的大小。
texts要嵌入的文本列表。
truncate如果文本比可用的标记长,应该取文本的哪一部分LEFT,RIGHT或者NONE。
所有这些你都可以在这里找到。
在本教程中,该cohere方法将作为我们类的一个方法来实现CoHere。
def embed(self, no_of_ex): # as a good developer we should split the dataset. data = pd.DataFrame(examples(no_of_ex)) self.X_train, self.X_test, self.y_train, self.y_test = train_test_split( list(data[0]), list(data[1]), test_size=0.2, random_state=0) # in the next two lines we create a numeric form of X_train data self.X_train_embeded = self.co.embed(texts=X_train, model="large", truncate="LEFT").embeddings self.X_test_embeded = self.co.embed(texts=X_test, model="large", truncate="LEFT").embeddingsX_train_embeded将是一个数字数组,看起来像这样:
[ 386, 0.39653537, -0.409076, 0.5956299, -0.06624506, 2.0539167, 0.7133603,...📈 Web 应用程序 – Streamlit
要创建一个比较两个可能性显示的应用程序,我们将使用Stramlit. 这是一个简单且非常有用的库。
安装
pip install streamlit我们需要co:hereAPI 密钥的文本输入。
在 streamlit 的文档中我们可以找到方法:
st.header()在我们的应用程序上制作标题
st.test_input()发送文本请求
st.button()创建按钮
st.write()显示连贯模型的结果。
st.progress()显示进度条
st.column()拆分应用程序
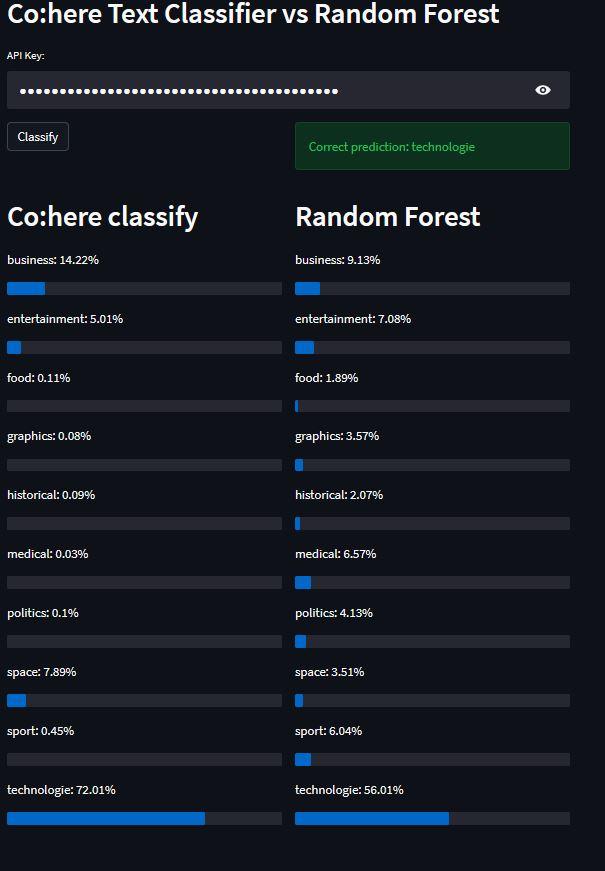
st.header("Co:here Text Classifier vs Random Forest")api_key = st.text_input("API Key:", type="password")cohere = CoHere(api_key)cohere.list_of_examples(50) # number of examples for Cohere classifier # showed in the previous tutorial cohere.embed(1000) # number of examples for random forest# initialization of random forest with sklearn libraryforest = RandomForestClassifier(max_depth=10, random_state=0) col1, col2 = st.columns(2)if col1.button("Classify"): # training process of random forest, to do it we use embedded text. forest.fit(cohere.X_train_embeded, cohere.y_train) # prediction process of random forest predict = forest.predict_proba(np.array(cohere.X_test_embeded[0]).reshape(1, -1))[0] here = cohere.classify([cohere.X_test[0]])[0] # prediction process of cohere classifier col2.success(f"Correct prediction: {cohere.y_test[0]}") # display original label col1, col2 = st.columns(2) col1.header("Co:here classify") # predictions for cohere for con in here.confidence: col1.write(f"{con.label}: {np.round(con.confidence*100, 2)}%") col1.progress(con.confidence) col2.header("Random Forest") # predictions for random forest for con, pred in zip(here.confidence, predict): col2.write(f"{con.label}: {np.round(pred*100, 2)}%") col2.progress(pred)运行 streamlit 应用程序使用命令
streamlit run name_of_your_file.py创建的应用程序看起来像这样

💡 结论
文本嵌入是一种强大的工具,可用于提高机器学习算法的性能。神经网络是一种广泛使用且有效的创建文本嵌入的方法。文本嵌入可用于文本分类、文本相似性和文本聚类等任务。
在本教程中,我们将Random Forest与进行比较Co:here Classifier,但是 的可能性Co:here Embedder是巨大的。你可以用它构建很多东西。
请继续关注AIHubPro未来百科的教程!此代码的存储库可以在此处查看。找到您周围的问题并构建 cohere 应用程序来修复它。
谢谢你!– AI未来百科 ; 探索AI的边界与未来! 懂您的AI未来站